Showing posts with label maya. Show all posts
Showing posts with label maya. Show all posts
Wednesday, February 5, 2020
Character Animation On A Higher Level
Impressive presentation at Siggraph 2019 about an animation system called “ephemeral” rigging.

Thursday, October 24, 2019
Universal Scene Description - Moving to the Next Level
It is reminiscent to this music:
So USD (Universal Scene Description) has been announced long long time ago. I wrote about it 2016. Major studios pleased to Pixar that they
open-sourced their technology.
I thought during that time it could standardize pipelines some level. Because the main pipeline issue is always that how to transfer/share data from one process/software to another.
Now (4 years later) it seems the topic starting to be HOT. Software development companies like Autodesk and Side Effects Software step further to make available USD for users / companies which can't afford a big investment into pipeline development.
Side Effects Software
Autodesk
Universal Scene Description: Open Source at Autodesk from Autodesk Media and Entertainment on Vimeo.
The Foundry
Blender
Friday, December 28, 2018
Blender news
While I keep waiting for the new version of Maya, there are lot of happaning around the Blender side of the world.
Of course Blender 2.8 beta is out.
Check the blog.
https://code.blender.org/2018/11/blender-2-8-beta/
The Grace Pencil tool is now a complete 2D (and 3D) animation tool. You might already seen the Hero short:
And another asthonising video about Grace Pencil as a 2D/3D concept art tool:
And there is another open movie in production: Spring. You can check this ouy here:
https://cloud.blender.org/p/spring/
Yet another asthonising video. It is a commercial animated in Maya and rendered in Blender.
And so on...
Of course Blender 2.8 beta is out.
Check the blog.
https://code.blender.org/2018/11/blender-2-8-beta/
The Grace Pencil tool is now a complete 2D (and 3D) animation tool. You might already seen the Hero short:
And another asthonising video about Grace Pencil as a 2D/3D concept art tool:
And there is another open movie in production: Spring. You can check this ouy here:
https://cloud.blender.org/p/spring/
Yet another asthonising video. It is a commercial animated in Maya and rendered in Blender.
And so on...
Friday, November 2, 2018
Where is Maya 2019?
Autodesk secretly update Maya at late summer. There is no features videos and other stuff but there is Maya 2018.4. Awesome! We can read the documentation here.

But we know that there should be a Maya 2019 before 2019 because the version numbers always promote the future. I guess there has to be something huge in the background, because Maya has the 20th anniversary. So Maya 2019 has to be an awesome cool crazy good fascinating verions. One version to rule them all :)
But we know that there should be a Maya 2019 before 2019 because the version numbers always promote the future. I guess there has to be something huge in the background, because Maya has the 20th anniversary. So Maya 2019 has to be an awesome cool crazy good fascinating verions. One version to rule them all :)
Monday, October 15, 2018
Open Source Tools - Photogrammetry with MeshRoom
I had recently an encounter with Meshroom.
https://alicevision.github.io/#meshroom
It is a free and open source software for photogrammetry. So I did not hesitate to try it out.
I took 89 photos with a Canon 750D full resloution: 6000x4000 pixel. Something like this:

Meshroom is ideal for beginners, because we don't have to adjust anything. Just hit start and wait patiently. I'm not sure how much time it took but I guess arond 4-5 hours.
So the result around 5 million poligons and 7 4K texture map. I imported the geometry (.obj file) to maya. It seems like this:


https://alicevision.github.io/#meshroom
It is a free and open source software for photogrammetry. So I did not hesitate to try it out.
I took 89 photos with a Canon 750D full resloution: 6000x4000 pixel. Something like this:

Meshroom is ideal for beginners, because we don't have to adjust anything. Just hit start and wait patiently. I'm not sure how much time it took but I guess arond 4-5 hours.
So the result around 5 million poligons and 7 4K texture map. I imported the geometry (.obj file) to maya. It seems like this:


Wednesday, October 4, 2017
Industry news - Maya 2018 and Nuke 11
Okay, it is oldies right now but I think it is worth to mention a couple of thing. I think Nuke and Maya now related to announce the latest release almost the same time. I can't say that huge development going on. I miss the feeling when a software release hit me and I say "waaoooo amazing! I can't wait to try the new features".
Maya 2018
It's a little bit strange that there is no official announcement video. Maya 2018 released so quietly. We can think that Autodesk knows there is no reason to do the hype. So here are what I found:
Maya 2018
It's a little bit strange that there is no official announcement video. Maya 2018 released so quietly. We can think that Autodesk knows there is no reason to do the hype. So here are what I found:
The devil lies in the details. I guess they were tired to create fancy feature videos but if we go through the user guide we can find a lot of useful stuff especially in connection with modelling. But still no breakthrough at Bifröst. There is now sing of a general procedural workflow inside Maya. The (new) render setup system seams still not working with references so it kind of a worthless.
Nuke 11
And Nuke announcement is also a bit woozy (or something like that, and the music is shitty as well).
So there is new Lens Distortion and Precomp node has a new name called LiveGroup, background rendering. What else? I guess the VFX Reference Platform is interesting for big studios for pipeline TD's but not for artist.
I guess with Nuke is the main problem is that Nuke is a complete software. Probably the best choice for compositing for films (is there competitors? Maybe Fusion?). There is no certain direction to develop Nuke because it would overlap other Foundry related softwares like Modo and Mari. In a business point of view there is no reason to develop for example a better modelling toolkit for Nuke to do better photogrammetry and re-modelling, projecting, texturing workflow. There is Modo and Mari for that. But for an artist it is always better to use one software for related tasks saving "tons of time" to export-import, naming, versioning, convert files.
Saturday, May 20, 2017
Maya Tricks - Maya Pivot
If you want to know everything about pivot points in maya you should check this video:
Maya Tricks - Measure rgba value range
Let's say we have a file texture and we want to adjust the color of that. We have plenty of options to do that. I think the most sophisticated is the ColorRemap node which is similar to Photoshop's or GIMP's Curves tool or Nuke's ColorLookup node however Maya's ColorRemap is less user friendly I think.

Maya has an option to make a node graph to recolor the picture based on its luminance. We can create the node graph simply just clicking to the Color Remap button below the file node's effects rollout.

The node graph is going to look like this.

The ramp node has a default black to white gradient. We can change the black to blue for eg. and it will change the darkest colors on the picture to blue. Picture like this:

with a ramp like this:

going to result a picture as we can see below:

The simpliest and obvious solution to change colors is to use the file node's built-in Color Balance options.

These options have limited capabilities of course. We can use textures on Color Offset or Color Gain for eg. Color Gain multiplies the texture file's color and Color Offset adds to or substracts from the input color. Maya has nodes for the basic mathematical operations: multiplyDivied and the plusMinusAverage.
But when we adjust the color of the original texture especially when we use Color Gain (multiplication) or Color Offset (addition) we modify the color range of the picture. As far as I know maya has no tool to measure color range of a picture. It would be useful when we use the modified map to emit fluid for example. Especially true when we use animated maps. We have setRange node but there should be an option to copy the current range values to the oldMin and oldMax fields.
There might be a python (pyMel or API) trick to achieve that. Let me know if there is a method to query the color range of a (texture) node output.
I found an easy solution to visualize the color range of a picture using the SOuP plug-in. It provides the textureToArray node. With that we can sample a texture and plug into the SOuP's peak deformer. So basically we can create a displace modifier. Unfortunately the (new) textureDeformer has limited options to acieve that effect. HightField has the same weakness.
To display our colorRange with SOuP nodes we can use a polyPlane as a base geometry. We have to setup a following network:


Of course the measure of the peak is adjustable on the peak derormer.

This setup helps to visualize the RGBA or this case the luminance values. Since we use color management in maya. We can sample in maya viewport (or everywhere else) the real (not only 0-1) color value. So this setup give us a hint which areas have the highest or lowest values.


We can get further if we query the list of y value of the vertices and get the color of the lowest and highest value by the colorAtPoint MEL (or python command).

Maya has an option to make a node graph to recolor the picture based on its luminance. We can create the node graph simply just clicking to the Color Remap button below the file node's effects rollout.

The node graph is going to look like this.

The ramp node has a default black to white gradient. We can change the black to blue for eg. and it will change the darkest colors on the picture to blue. Picture like this:

with a ramp like this:

going to result a picture as we can see below:

The simpliest and obvious solution to change colors is to use the file node's built-in Color Balance options.

These options have limited capabilities of course. We can use textures on Color Offset or Color Gain for eg. Color Gain multiplies the texture file's color and Color Offset adds to or substracts from the input color. Maya has nodes for the basic mathematical operations: multiplyDivied and the plusMinusAverage.
But when we adjust the color of the original texture especially when we use Color Gain (multiplication) or Color Offset (addition) we modify the color range of the picture. As far as I know maya has no tool to measure color range of a picture. It would be useful when we use the modified map to emit fluid for example. Especially true when we use animated maps. We have setRange node but there should be an option to copy the current range values to the oldMin and oldMax fields.
There might be a python (pyMel or API) trick to achieve that. Let me know if there is a method to query the color range of a (texture) node output.
I found an easy solution to visualize the color range of a picture using the SOuP plug-in. It provides the textureToArray node. With that we can sample a texture and plug into the SOuP's peak deformer. So basically we can create a displace modifier. Unfortunately the (new) textureDeformer has limited options to acieve that effect. HightField has the same weakness.
To display our colorRange with SOuP nodes we can use a polyPlane as a base geometry. We have to setup a following network:

It is important to check the accurateSampling option on textureToArray node. That will ensure to sample trough to whole network.

In this case I use a luminace sampling using the luminance node and the output in this case the alpha channel. So the peak deformer is using the luminance values to offset the vertices.
If we apply the color as a surfaceShader to the plane the result will look like this.


This setup helps to visualize the RGBA or this case the luminance values. Since we use color management in maya. We can sample in maya viewport (or everywhere else) the real (not only 0-1) color value. So this setup give us a hint which areas have the highest or lowest values.

Thursday, November 24, 2016
Maya Tips & Tricks - Using directories outside of the maya project stucture (relative path)
One of the main purpose to use Maya project structure to have the ability to reference directories locally. That means the project can be relocated. Let's say we have the Maya project root folder:
r:/Projects/201401_OBP/shotProd/010/maya
So the Maya default project structure look like this:

Beside the folders there is the workspace.mel file which describes the file rules within that Maya projects. In practice that means if you have Maya running and set this project (File menu / Set Project...) and you hit the Open Scene... from the File menu the file browser pops up pointing to directory below:
r:/Projects/201401_OBP/shotProd/010/maya/scenes
The workspace.mel file contains a mel command to address the file rule for Maya scene files:
workspace -fr "scene" "scenes";
More precisely there are two more file rule because of the maya scene file extensions. One for the .mb and one for the .ma extension:
workspace -fr "mayaAscii" "scenes";
workspace -fr "mayaBinary" "scenes";
The absolute scenes path is generated like this based on the current file rule:
project root + /scenes
So Maya referencing the scenes directory below the Maya project root folder. Since than it does not matter where the Maya project is in the directory structure because inside the project it will be always valid.
But in studio scenario we can pretend that for eg. the Maya renders should be elsewhere than below the maya project as the default file rule describe it:
workspace -fr "images" "images";
Without any adjustment if we want to render an image it will look like this on Maya render settings panel:

As before the absolute scenes path generated like this based on the current file rule:
project root + /images (the file name is the scene name by default.)
So as mentioned before usually we want to use an external directory to output the renders so the compositors don't have to look up it inside a Maya project but a directory with more general purpose. So the render (images) directory should be something like this:
r:/Projects/201401_OBP/shotProd/010/elements
We can avoid to use that absolute path. Maya can use relative path as a file rule. Just have to use the "../" syntax. It tells to Maya to go one directory up relative to the root folder. My super cool explanation picture:

To reference the elements directory the file rule will look like this:
workspace -fr "images" "../elements";
My experience is that if I directly edit the workspacel.mel file maya only recognize that change after a restart. To edit the file rule via Project Window from the File menu it works fine.
Using relative paths means your project relocatable but the maya project itself depends on the outside directory structure.
Further reading.
r:/Projects/201401_OBP/shotProd/010/maya
So the Maya default project structure look like this:

Beside the folders there is the workspace.mel file which describes the file rules within that Maya projects. In practice that means if you have Maya running and set this project (File menu / Set Project...) and you hit the Open Scene... from the File menu the file browser pops up pointing to directory below:
r:/Projects/201401_OBP/shotProd/010/maya/scenes
The workspace.mel file contains a mel command to address the file rule for Maya scene files:
workspace -fr "scene" "scenes";
More precisely there are two more file rule because of the maya scene file extensions. One for the .mb and one for the .ma extension:
workspace -fr "mayaAscii" "scenes";
workspace -fr "mayaBinary" "scenes";
The absolute scenes path is generated like this based on the current file rule:
project root + /scenes
So Maya referencing the scenes directory below the Maya project root folder. Since than it does not matter where the Maya project is in the directory structure because inside the project it will be always valid.
But in studio scenario we can pretend that for eg. the Maya renders should be elsewhere than below the maya project as the default file rule describe it:
workspace -fr "images" "images";
Without any adjustment if we want to render an image it will look like this on Maya render settings panel:
As before the absolute scenes path generated like this based on the current file rule:
project root + /images (the file name is the scene name by default.)
So as mentioned before usually we want to use an external directory to output the renders so the compositors don't have to look up it inside a Maya project but a directory with more general purpose. So the render (images) directory should be something like this:
r:/Projects/201401_OBP/shotProd/010/elements
We can avoid to use that absolute path. Maya can use relative path as a file rule. Just have to use the "../" syntax. It tells to Maya to go one directory up relative to the root folder. My super cool explanation picture:
To reference the elements directory the file rule will look like this:
workspace -fr "images" "../elements";
My experience is that if I directly edit the workspacel.mel file maya only recognize that change after a restart. To edit the file rule via Project Window from the File menu it works fine.
Using relative paths means your project relocatable but the maya project itself depends on the outside directory structure.
Further reading.
Thursday, April 21, 2016
Waiting for Maya 2017 - Maya 2016 Extension 2
It seems Autodesk is late to announcing the annual version of Maya. I have the idea what kind of improvements will be in the new release. They have already featured as Maya Extension 2 (Extension 1 was published around the last summer). Or it means there won't be Maya 2017? Or they are just waiting to 2017 to announce Maya 2017?
Motion Graphics Toolset
Deep Adaptive Fluid Simulation
Enhanced Animation Performance
Shape Authoring Workflow and Character Rigging
Enhanced Symmetry Modelling
Render Setup
Motion Graphics Toolset
Deep Adaptive Fluid Simulation
Enhanced Animation Performance
Shape Authoring Workflow and Character Rigging
Enhanced Symmetry Modelling
Render Setup
Monday, April 4, 2016
Maya Bug - Viewport 2.0 - Gimbal Axis
Another viewport 2.0 bug. If we rotating an item in hierarchy, a joint for example, we will see that the axes are rotating in a strange way. Since we rotated in one direction we can't rotate by grabbing the manipulator's circles (representing the x, y, z axes) any more because they actually have a different orientation. If we switch back to legacy viewport we will see the correct orientations.
In viewport 2.0 looks like this:
 And the correct legacy viewport shows this:
 I tend to call legacy viewport as legal viewport recently because it seems viewport 2.0 is corrupted (sometimes).
In viewport 2.0 looks like this:


Monday, February 1, 2016
Maya Bug - Viewport 2.0 Refresh
I tested on Maya 2015 and 2016. For example if we create a multilevel instanced hierarchy:

and remove one object at the second level:
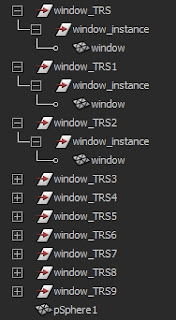
the object looks still instanced in the viewport:

If we change to Legacy Default Viewport it looks correct. To refresh Viewport 2.0 I had to reload the maya scene.

and remove one object at the second level:

the object looks still instanced in the viewport:

If we change to Legacy Default Viewport it looks correct. To refresh Viewport 2.0 I had to reload the maya scene.
Wednesday, September 30, 2015
Maya Rigging - Analyze stretching and compression with SOuP tensionMap
As we all know that SOuP maya plugin package has the tensionMap node. What it does is that colour coding the stretching or compression occurs on the deformed surface. It can be used for a lot of things. For example it can triggers blendShapes based on the surface compression or stretching.
I found it was useful to analyse how skinClusters (skin deformation) and blendShapes (morphed geometries) affected on the result surface. I made a short video to demonstrate this.
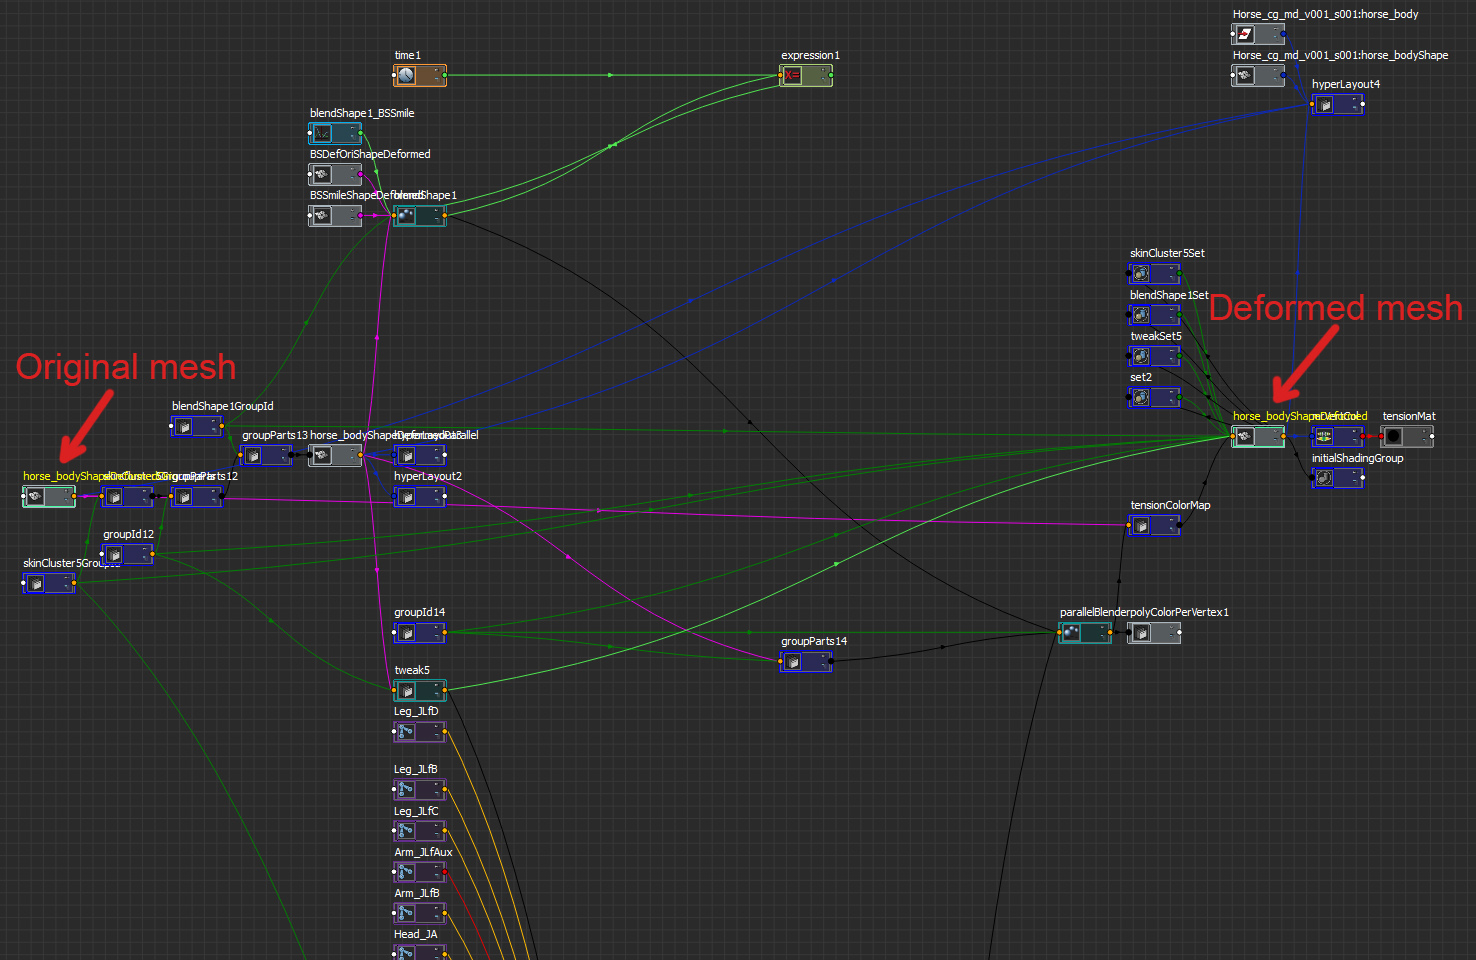
To utilize the tensionMap node easily I wrote a simple python script. We have to select the deformed mesh first and the original mesh after. It might be tricky to find those nodes in the node graph as you see below.

So here is the script:
I hope it works fine for you.
I found it was useful to analyse how skinClusters (skin deformation) and blendShapes (morphed geometries) affected on the result surface. I made a short video to demonstrate this.
To utilize the tensionMap node easily I wrote a simple python script. We have to select the deformed mesh first and the original mesh after. It might be tricky to find those nodes in the node graph as you see below.
So here is the script:
 def AddTensionMaterial(Selection):
     """
     == DESCRIPTION ==
     It creates a lambert material diffuse color input from the vertex color map.
     The color map is from SOuP tensionMap with applies an RGB color code to represent tension on the surface of the geometry.
     Basic color code:
     Green - relaxed
     Blue - stretch
     Red - compression
     There is no error handling currently. SOuP plugin has to be loaded.
     === Limitations ===
     It considers only the current modifiers.
     === Side Effects ===
     Assign verex color set
     == INPUT ARGUMENTS ==
     + List - Selection - Mesh nodes has to be selected in order -> select the deformed mesh first and the original one after
     +
     == RETURN ==
     None
     == TOOLTIP ==
     Select the stretched or compressed shape node and the original (non-stretched or compressed)
     shape then run the code like this:
     AddTensionMaterial(cmds.ls(sl = 1))
     """
     shapeResult = Selection[0]
     shapeOriginal = Selection[1]
     tensMap = cmds.shadingNode("tensionMap", asUtility = 1, n = "tensionColorMap")
     lastDefomerOutput = cmds.listConnections(shapeResult + ".inMesh", source = 1, destination = 0, plugs = 1 )[0]
     cmds.polyColorPerVertex(shapeResult, relative = 1, r = 0.5, g = 0.5, b = 0.5, a = 1, colorDisplayOption = 1)
     cmds.connectAttr(lastDefomerOutput , tensMap + ".inGeometry")
     cmds.connectAttr(shapeOriginal + ".worldMesh[0]", tensMap + ".restGeometry")
     cmds.connectAttr(tensMap + ".outGeometry", shapeResult + ".inMesh", f = 1)
     mrVertC = cmds.shadingNode("mentalrayVertexColors", asTexture = 1, n = "mrVertCol")
     cmds.connectAttr(shapeResult + ".colorSet[0].colorName", mrVertC + ".cpvSets[0]", force = 1)
     tensionShader = cmds.shadingNode("lambert", asShader = 1, n = "tensionMat")
     cmds.connectAttr(mrVertC + ".outColor", tensionShader + ".color")
I hope it works fine for you.
Thursday, June 11, 2015
Maya - Node Types - Filter Types
How to list all the lambert shaders in maya?
Well, if we use the MEL or pyhton command ls -type "lambert" we get more than just lambert shaders (if there are others in the scene). The reason is that the lambert shader has a type name which is the type for eg. blinn and phong are inherited from. The class hierarchy or inheritance diagram looks like this.

We can get this from the maya API documentation but we can query via MEL or python commands.
The following line gives us the inheritance diagram of "blinn1" shader as a list:
As we can see the items are similar but not the same. That is why because MEL and python scripts not work with C++ API names. If we look up blinn node from the nodes list of the technical documentation area we can see the parents field:
 If we click on reflect we get the node to get the description of that node we can see the relfect node's partent is the lambert.
 So we can really search node types or "supertypes". We can imagine these nodes as part of a set. Maya ls command and other commands with type flag can use these types. So for eg. we can list all the shape nodes in the scene by entering the following line:
Or we can filter all the geometry type shapes, like curves, nurbs surfaces, meshes:
So answering the first question: we can filter lambert shaders if we list lambert type with ls than check the exact type with nodeType command.
With python set we can achieve useful functions easily. I wrote a function to check two or more objects' common type. I hope it works well.
Well, if we use the MEL or pyhton command ls -type "lambert" we get more than just lambert shaders (if there are others in the scene). The reason is that the lambert shader has a type name which is the type for eg. blinn and phong are inherited from. The class hierarchy or inheritance diagram looks like this.

We can get this from the maya API documentation but we can query via MEL or python commands.
The following line gives us the inheritance diagram of "blinn1" shader as a list:
 cmds.nodeType("blinn1", inherited = 1)
 # Result: [u'shadingDependNode', u'lambert', u'reflect', u'blinn'] #
As we can see the items are similar but not the same. That is why because MEL and python scripts not work with C++ API names. If we look up blinn node from the nodes list of the technical documentation area we can see the parents field:

cmds.ls(type = "shape")
Or we can filter all the geometry type shapes, like curves, nurbs surfaces, meshes:
cmds.ls(type = "geometryShape")
So answering the first question: we can filter lambert shaders if we list lambert type with ls than check the exact type with nodeType command.
 lambertTypeMaterialList = cmds.ls(type = "lambert")
 lambertMaterialList = []
 for item in lambertTypeMaterialList:
     if cmds.nodeType(item) == "lambert":
         lambertMaterialList.append(item)
 # Result: [u'lambert1', u'lambert2'] #
With python set we can achieve useful functions easily. I wrote a function to check two or more objects' common type. I hope it works well.
 def GetCommonClass(SelectedNodeList):
     '''
     == DESCRIPTION ==
     Get the common type of the passed object list which is the first item in the inheritance diagram.
     For eg. if we test a directionalLight and a nurbsCurve type nodes together the inheritance diagram are like this:
     [u'containerBase', u'entity', u'dagNode', u'shape', u'geometryShape', u'deformableShape', u'controlPoint', u'curveShape', u'nurbsCurve']
     [u'containerBase', u'entity', u'dagNode', u'shape', u'light', u'renderLight', u'nonAmbientLightShapeNode', u'nonExtendedLightShapeNode', u'directionalLight']
     And we can see the first common type is the 'shape'.
     == INPUT ARGUMENTS ==
     + list - SelectedNodeList - Maya node list
     +
     == RETURN ==
     string - the first common type
     == DEPENDENCIES ==
     - maya.cmds
     -
     '''
     if SelectedNodeList:
         nodeTypeList = []
         nodeTypeSet = set()
         for item in SelectedNodeList:
             nodeTypeList = cmds.nodeType(item, inherited = 1)
             print nodeTypeList
             if len(nodeTypeSet) != 0:
                 nodeTypeSet.intersection_update(set(nodeTypeList))
                 if len(nodeTypeSet) == 0:
                     print "There is no common type within selection."
                     return None
             else:
                 nodeTypeSet.update(set(nodeTypeList))
         commonTypeIndexList = []
         for commonType in nodeTypeSet:
             commonTypeIndexList.append(nodeTypeList.index(commonType))
         firstCommonType = nodeTypeList[sorted(commonTypeIndexList)[-1]]
         return firstCommonType
     else:
         return None
Wednesday, April 22, 2015
Implementing RV in Maya as a Sequence Viewer
You migth wonder how the hack maya can call RV to play the image sequence right after the playblast. It is quite simple. You have to set it in the Preferences window (Window menu / Settings/Preferences / Preferences).

Below the Image Sequence in the left text field enter the file path of the rvpush.exe. The Optional Flags should be this:
-tag playblast merge %f
Source
Below the Image Sequence in the left text field enter the file path of the rvpush.exe. The Optional Flags should be this:
-tag playblast merge %f
Source
Tuesday, April 21, 2015
Ideas for Maya - Search and highlight items in Attribute Editor
As all maya user know that there is a forum where we can share ideas about maya. We can pressure the developers to pull themselves together. So please vote for this idea. It is really important for you and me and the community and for the country, of course.
Search and highlight items in Attribute Editor
This is the base forum:
Ideas for maya
And there is another:
Small annoying things to fix in maya
I just wonder there is no "big annoying things to fix in maya" forum. I would have a couple of hints :)
Search and highlight items in Attribute Editor
This is the base forum:
Ideas for maya
And there is another:
Small annoying things to fix in maya
I just wonder there is no "big annoying things to fix in maya" forum. I would have a couple of hints :)
Wednesday, April 15, 2015
Maya Bug - UV Set renaming
Okay, it might not be a bug we can call it feature :)
When an object has a history and you would like to rename the current UV Set it will produce error.
Case one:
There will be a new UV Set with the name you just gave.
Case two:
The current UV Layout will disappear
Case three:
Maya crash
Case four:
I had a situation when the unwanted new UV Set had a new UV layout as well.
And you should know you can't undo these operations. You definitely can't undo when maya crashes.
Fortunately if you delete the history before renaming it will work.
When an object has a history and you would like to rename the current UV Set it will produce error.
Case one:
There will be a new UV Set with the name you just gave.
Case two:
The current UV Layout will disappear
Case three:
Maya crash
Case four:
I had a situation when the unwanted new UV Set had a new UV layout as well.
And you should know you can't undo these operations. You definitely can't undo when maya crashes.
Fortunately if you delete the history before renaming it will work.
Monday, February 23, 2015
Maya Bug - displayColor in maya 2015
Let's call it bug. Before maya 2015 SP5 we used maya 2012 in the studio. I don't know which version is the first where this "feature" was added to maya.
If I run this line it produces RuntimeError:
The funny thing is it changes the color but produces error. So I can handle it with exception.
I know what you are thinking: Holy crap!
So is there something I don't know? Or what?
If I run this line it produces RuntimeError:
cmds.displayColor("headsUpDisplayLabels", 16, dormant = 1)
The funny thing is it changes the color but produces error. So I can handle it with exception.
 try:
   cmds.displayColor("headsUpDisplayLabels", 16, dormant = 1)
 except RuntimeError:
   pass
I know what you are thinking: Holy crap!
So is there something I don't know? Or what?
Thursday, February 19, 2015
Maya (2013+) - imagePlane issue
I had trouble with imagePlane in maya 2015. As far as I know it is changed around maya 2013. ImagePlane now has a transform node so it looks like a standard object. You can create it from the menu: Create / Free Image Plane.

The strange thing is that when it is attached to a camera. It looks like a hierarchy (see below)

but it can't be unparent or reparent. So there is a special connection. In nodeEditor it also looks like a typical hierarchy where the transform node does not have any connection.

Only thing which can refer to some special condition is found in the scriptEditor when the imagePlane is selected:
select -r CameraShape->imagePlane1 ;
I experienced this syntax with positionMarkers. Actually I wrote about it before.
That is how I find out there is a term of underworld nodes in maya. You can read about it here or a more here. Consider underworld node as a component like a NURBS CV and it will explain why it can't be unparented for eg.
So...we can create an imagePlane with MEL command (since maya 2013) like this:
imagePlane -name "myImagePlane" -camera "CameraShape";
And we can redirect" an existing imagePlane to another camera with the edit flag:
imagePlane -edit -camera "NewCameraShape" "myImagePlane";
I found the easiest way to get the imagePlane from the camera is to call this:
listRelatives -allDescendents "cameraShape"
The strange thing is that when it is attached to a camera. It looks like a hierarchy (see below)
but it can't be unparent or reparent. So there is a special connection. In nodeEditor it also looks like a typical hierarchy where the transform node does not have any connection.
select -r CameraShape->imagePlane1 ;
I experienced this syntax with positionMarkers. Actually I wrote about it before.
That is how I find out there is a term of underworld nodes in maya. You can read about it here or a more here. Consider underworld node as a component like a NURBS CV and it will explain why it can't be unparented for eg.
So...we can create an imagePlane with MEL command (since maya 2013) like this:
imagePlane -name "myImagePlane" -camera "CameraShape";
And we can redirect" an existing imagePlane to another camera with the edit flag:
imagePlane -edit -camera "NewCameraShape" "myImagePlane";
I found the easiest way to get the imagePlane from the camera is to call this:
listRelatives -allDescendents "cameraShape"
Monday, February 2, 2015
Digital Production Pipeline
Literally the best video on youtube. I think don't have to append anything to this.
Subscribe to:
Posts (Atom)