Tuesday, December 1, 2015

Breakdown / Making Of 1.

There is a lot of breakdown and making of stuff out there. A couple of my favorites below.

Development of the animation for special creatures in Cloudy with a Chance of Meatballs 2


ILM raised the standards of the breakdown clips. Check this out how it looks about the movie Battleship:


Character design on the film Rise of the Guardians:


Wednesday, September 30, 2015

Autodesk Vision Series 2015

I think it is time to relax and let Autodesk be our entertainer. Okay, you might think I`m biased (or paid by Autodesk which is not the case unfortunately) I spend  most of my time using Maya. Of course I`m biased. I wish I had more time to do cool stuff with other softwares like Modo, Houdini, ZBrush, Dynamo, Krita and learn more about  Blender, Substance Painter and DesignerPhotoshop, AfterEffects, Photoscan, PFTrack, FinalCut, Flix, Mari, Nuke, Hiero, Katana, Arnold, Renderman, OpenColorIO, ShotGun, Tactic, fTrack, USD, OSL, MU, Python, C++, JavaScript, never ending story...

Anyway, just relax and watch these videos:

Virtual production


Rendering and the cloud


The topic is Procedural Content Creation and the software is 3DS Max. I have to admit it is a bit disappointing for me because we waiting soo long ago a system like that in Maya. Okay, there is SOuP so Autodesk bosses think we don`t need proceduralism any more because we already have it.


And last but not least: Editorial


Maya Rigging - Analyze stretching and compression with SOuP tensionMap

As we all know that SOuP maya plugin package has the tensionMap node. What it does is that colour coding the stretching or compression occurs on the deformed surface. It can be used for a lot of things. For example it can triggers blendShapes based on the surface compression or stretching.

I found it was useful to analyse how skinClusters (skin deformation) and blendShapes (morphed geometries) affected on the result surface. I made a short video to demonstrate this.


To utilize the tensionMap node easily I wrote a simple python script. We have to select the deformed mesh first and the original mesh after. It might be tricky to find those nodes in the node graph as you see below.


So here is the script:


 def AddTensionMaterial(Selection):  
     """  
     == DESCRIPTION ==  
     It creates a lambert material diffuse color input from the vertex color map.   
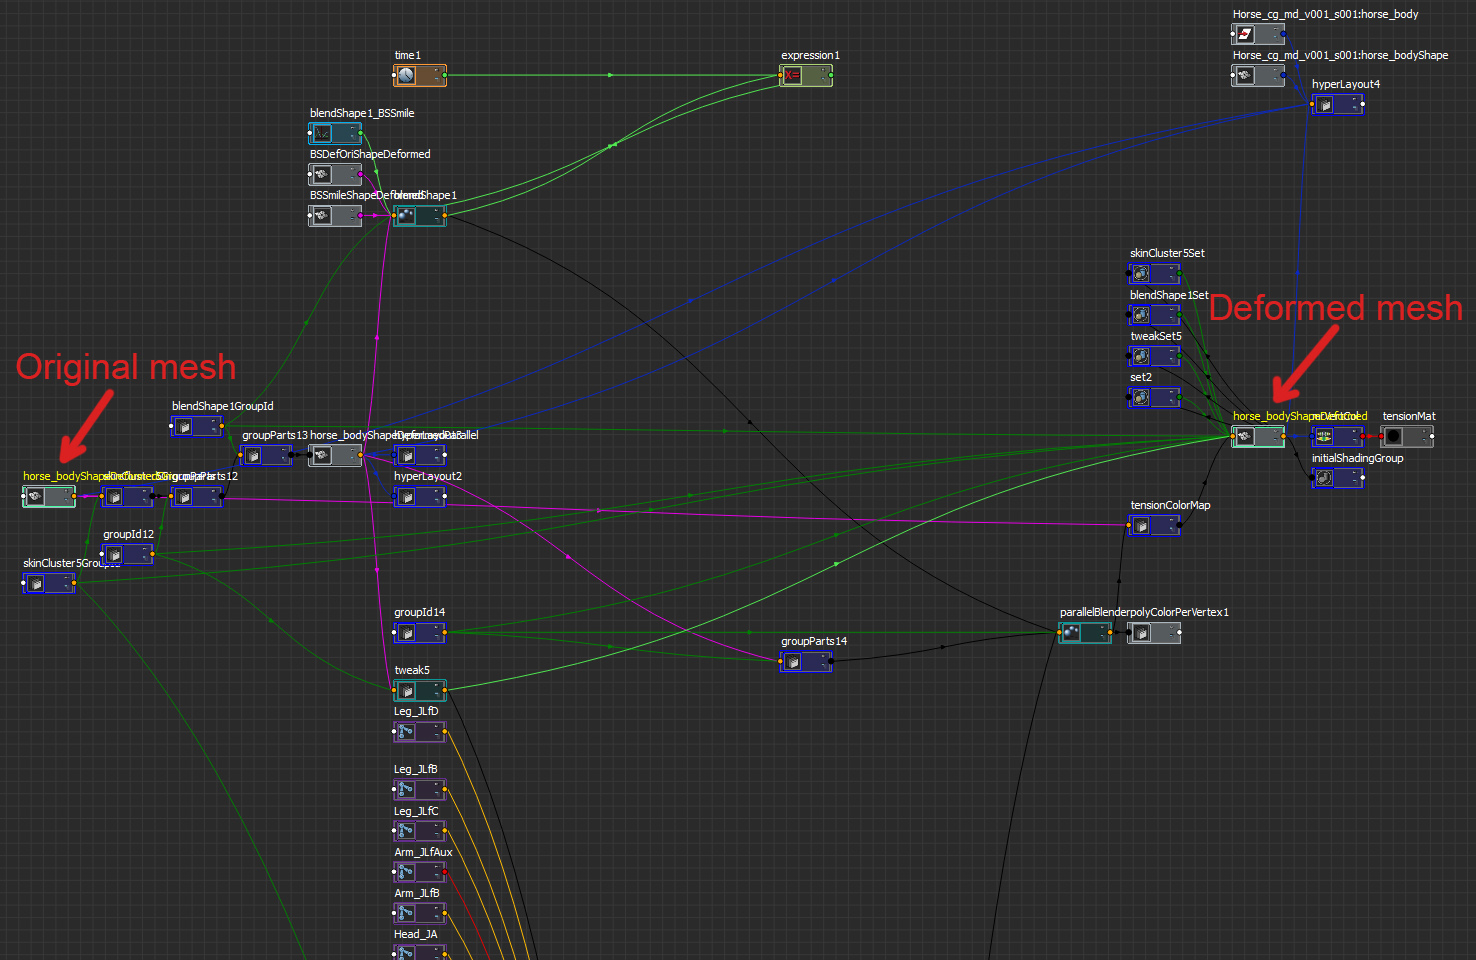
     The color map is from SOuP tensionMap with applies an RGB color code to represent tension on the surface of the geometry.  
     Basic color code:  
     Green - relaxed  
     Blue - stretch  
     Red - compression  
     There is no error handling currently. SOuP plugin has to be loaded.  
     === Limitations ===  
     It considers only the current modifiers.  
     === Side Effects ===  
     Assign verex color set  
     == INPUT ARGUMENTS ==  
     + List - Selection - Mesh nodes has to be selected in order -> select the deformed mesh first and the original one after  
     +  
     == RETURN ==  
     None
     == TOOLTIP ==
     Select the stretched or compressed shape node and the original (non-stretched or compressed) 
     shape then run the code like this:
     AddTensionMaterial(cmds.ls(sl = 1))  
     """  
     shapeResult = Selection[0]  
     shapeOriginal = Selection[1]  
     tensMap = cmds.shadingNode("tensionMap", asUtility = 1, n = "tensionColorMap")  
     lastDefomerOutput = cmds.listConnections(shapeResult + ".inMesh", source = 1, destination = 0, plugs = 1 )[0]  
     cmds.polyColorPerVertex(shapeResult, relative = 1, r = 0.5, g = 0.5, b = 0.5, a = 1, colorDisplayOption = 1)  
     cmds.connectAttr(lastDefomerOutput , tensMap + ".inGeometry")  
     cmds.connectAttr(shapeOriginal + ".worldMesh[0]", tensMap + ".restGeometry")  
     cmds.connectAttr(tensMap + ".outGeometry", shapeResult + ".inMesh", f = 1)  
     mrVertC = cmds.shadingNode("mentalrayVertexColors", asTexture = 1, n = "mrVertCol")  
     cmds.connectAttr(shapeResult + ".colorSet[0].colorName", mrVertC + ".cpvSets[0]", force = 1)  
     tensionShader = cmds.shadingNode("lambert", asShader = 1, n = "tensionMat")  
     cmds.connectAttr(mrVertC + ".outColor", tensionShader + ".color")  

I hope it works fine for you.


Thursday, August 20, 2015

Gooseberry Project aka Cosmos Laundromat - First Cycle

The Blender Foundation released the first part of their open movie project called Gooseberry Project. The film title is Cosmos Laundromat. I think it is giant leap.


We can find tons of materials about this project on youtube and on the site. Via Blender Cloud we can also have access to all the source materials (blender files, textures, etc.) of the film.

A couple of videos I found usefull:

Animation progress


Victor's rig


Intresting mix of asset creation process


Tuesday, July 28, 2015

Photoshop - Tips and Tricks - Lasso Tool

If you ever tried to trace the contour of something with the Lasso Tool you might found that it was appropriate tool for organic things. However sometimes we need straight lines for the selection and that is where Polygonal Lasso Tool comes in place.
The thing is you can mix both in the same time.

If you press and hold the Alt (Option key on Mac ) and then release the (left) mouse button, you'll temporarily switch to the Polygonal Lasso tool so you can draw a straight line. If you hold the mouse button again can continue to use the Lasso Tool. When you release the Alt (Option) key and the mouse button, Photoshop completes your selection with a straight line.

How wonderful it is.

Thursday, June 11, 2015

Maya - Node Types - Filter Types

How to list all the lambert shaders in maya?
Well, if we use the MEL or pyhton command ls -type "lambert" we get more than just lambert shaders (if there are others in the scene). The reason is that the lambert shader has a type name which is the type for eg. blinn and phong are inherited from. The class hierarchy or inheritance diagram looks like this.


We can get this from the maya API documentation but we can query via MEL or python commands.

The following line gives us the inheritance diagram of  "blinn1" shader as a list:

 cmds.nodeType("blinn1", inherited = 1)  
 # Result: [u'shadingDependNode', u'lambert', u'reflect', u'blinn'] #   

As we can see the items are similar but not the same. That is why because MEL and python scripts not work with C++ API names. If we look up blinn  node from the nodes list of the technical documentation area we can see the parents field:


If we click on reflect we get the node to get the description of that node we can see the relfect node's partent is the lambert.

So we can really search node types or "supertypes". We can imagine these nodes as part of a set. Maya  ls command and other commands with type flag can use these types. So for eg. we can list all the shape nodes in the scene by entering the following line:

 cmds.ls(type = "shape")  

Or we can filter all the geometry type shapes, like curves, nurbs surfaces, meshes:

 cmds.ls(type = "geometryShape")  

So answering the first question: we can filter lambert shaders if we list lambert type with ls than check the exact type with nodeType command.

 lambertTypeMaterialList = cmds.ls(type = "lambert")  
 lambertMaterialList = []  
 for item in lambertTypeMaterialList:  
     if cmds.nodeType(item) == "lambert":  
         lambertMaterialList.append(item)  
 # Result: [u'lambert1', u'lambert2'] #   


With python set we can achieve useful functions easily. I wrote a function to check two or more objects' common type. I hope it works well.


 def GetCommonClass(SelectedNodeList):  
     '''  
     == DESCRIPTION ==  
     Get the common type of the passed object list which is the first item in the inheritance diagram.  
     For eg. if we test a directionalLight and a nurbsCurve type nodes together the inheritance diagram are like this:  
     [u'containerBase', u'entity', u'dagNode', u'shape', u'geometryShape', u'deformableShape', u'controlPoint', u'curveShape', u'nurbsCurve']  
     [u'containerBase', u'entity', u'dagNode', u'shape', u'light', u'renderLight', u'nonAmbientLightShapeNode', u'nonExtendedLightShapeNode', u'directionalLight']  
     And we can see the first common type is the 'shape'.  
     == INPUT ARGUMENTS ==  
     + list - SelectedNodeList - Maya node list  
     +  
     == RETURN ==  
     string - the first common type   
     == DEPENDENCIES ==  
     - maya.cmds  
     -  
     '''  
     if SelectedNodeList:  
         nodeTypeList = []  
         nodeTypeSet = set()  
         for item in SelectedNodeList:  
             nodeTypeList = cmds.nodeType(item, inherited = 1)  
             print nodeTypeList  
             if len(nodeTypeSet) != 0:  
                 nodeTypeSet.intersection_update(set(nodeTypeList))  
                 if len(nodeTypeSet) == 0:  
                     print "There is no common type within selection."  
                     return None  
             else:  
                 nodeTypeSet.update(set(nodeTypeList))  
         commonTypeIndexList = []  
         for commonType in nodeTypeSet:  
             commonTypeIndexList.append(nodeTypeList.index(commonType))  
         firstCommonType = nodeTypeList[sorted(commonTypeIndexList)[-1]]  
         return firstCommonType  
     else:  
         return None  

Wednesday, April 22, 2015

Implementing RV in Maya as a Sequence Viewer

You migth wonder how the hack maya can call RV to play the image sequence right after the playblast. It is quite simple. You have to set it in the Preferences window (Window menu / Settings/Preferences / Preferences).


Below the Image Sequence in the left text field enter the file path of the rvpush.exe. The Optional Flags should be this:

-tag playblast merge %f


Source

Tuesday, April 21, 2015

Ideas for Maya - Search and highlight items in Attribute Editor

As all maya user know that there is a forum where we can share ideas about maya. We can pressure the developers to pull themselves together. So please vote for this idea. It is really important for you and me and the community and for the country, of course.

Search and highlight items in Attribute Editor

This is the base forum:
Ideas for maya
And there is another:
Small annoying things to fix in maya

I just wonder there is no "big annoying things to fix in maya" forum. I would have a couple of hints :)

Wednesday, April 15, 2015

Maya Bug - UV Set renaming

Okay, it might not be a bug we can call it feature :)
When an object has a history and you would like to rename the current UV Set it will produce error.

Case one:
There will be a new UV Set with the name you just gave.

Case two:
The current UV Layout will disappear

Case three:
Maya crash

Case four:
I had a situation when the unwanted new UV Set had a new UV layout as well.

And you should know you can't undo these operations. You definitely can't undo when maya crashes.

Fortunately if you delete the history before renaming it will work.

Thursday, February 26, 2015

Nuke - Read Node - Image Sequence Length

Useful thing to display on read node the length of the image sequence. I guess the easiest way to do that is to use a TCL expression:

 [ expr [value last] - [value first] ]  

You can do it fancy way:

 length: [ expr [value last] - [value first] ]f  


On read node it will look like this.


How wonderful it is.

Monday, February 23, 2015

Maya Bug - displayColor in maya 2015

Let's call it bug. Before maya 2015 SP5 we used maya 2012 in the studio. I don't know which version is the first where this "feature" was added to maya.
If I run this line it produces RuntimeError:


 cmds.displayColor("headsUpDisplayLabels", 16, dormant = 1)  

The funny thing is it changes the color but produces error. So I can handle it with exception.


 try:  
   cmds.displayColor("headsUpDisplayLabels", 16, dormant = 1)  
 except RuntimeError:  
   pass  

I know what you are thinking: Holy crap!

So is there something I don't know? Or what?

Thursday, February 19, 2015

Maya (2013+) - imagePlane issue

I had trouble with imagePlane in maya 2015. As far as I know it is changed around maya 2013. ImagePlane now has a transform node so it looks like a standard object. You can create it from the menu: Create / Free Image Plane.


The strange thing is that when it is attached to a camera. It looks like a hierarchy (see below)


but it can't be unparent or reparent. So there is a special connection. In nodeEditor it also looks like a typical hierarchy where the transform node does not have any connection.


Only thing which can refer to some special condition is found in the scriptEditor when the imagePlane is selected:

select -r CameraShape->imagePlane1 ;

I experienced this syntax with positionMarkers. Actually I wrote about it before.

That is how I find out there is a term of underworld nodes in maya. You can read about it here or a more here. Consider underworld node as a component like a NURBS CV and it will explain why it can't be unparented for eg.

So...we can create an imagePlane with MEL command (since maya 2013) like this:

imagePlane -name "myImagePlane" -camera "CameraShape";

And we can redirect" an existing imagePlane to another camera with the edit flag:

imagePlane -edit -camera "NewCameraShape" "myImagePlane";

I found the easiest way to get the imagePlane from the camera is to call this:

listRelatives -allDescendents "cameraShape"

Friday, January 23, 2015

Naming Convention 4. - Numbers

We use numbers to count things. Avoid to use numbers on distinguish things.
Typical example to count versions like:
v001
v002
...
But not the best practice to distinguish different things like:
Tree_01
Tree_02
I usually use letters to distinguish variations.
Tree_A
Tree_B
...
Tree_Z
Using one letter can refer to 26 variations. We can extend it with double letters like:
Tree_AA
Tree_AB
...
We can combine variation with counter like this:
Tree_A_01
Tree_A_02
Tree_B_01
Tree_A_02
...

Anyway, this topic is about using numbers. We are talking about CG and VFX (as TidyVFX is about that) but this knowledge is important for the whole universe of course :)

To establish a naming convention means we have to specify for what to use numbers.

1. Count things
As I wrote above

2. Arrange things
For files and folders usually have to use numbers to specify a certain order because file systems use alphabetical order by default. For eg. if we have IN, OUT, PROD it would look like this in the file system:


But if you want a certain order you have to use numbers like this:


2.1 Padding series
Because of the file systems another thing to deal with is the padding. It is quite simple.
One character can produce ordered sequence from 1 to 9, two character from 1 to 99, etc.
For image sequences in VFX we usually use 4 digits and that means correct order 1 to 9999.
Also have to mention never start a sequence from 1 because it is a big issue when we have to extent it with 80 frame at the beginning for some reason. It would start from -80 and we really don't want that.

2.2 Padding shots (insert shots)
There is another function of padding in shot numbers for eg. We have to consider there could be new/extra shots during the production. So if we use 001, 002, 003, we can't insert a shot between 001 and 002. We have to extend the name with zeros. Same rule. If we use one character that means we can insert 9 extra shot.
So the shot numbers should be like this:
0010
0020
0030
The rule for inserting extra shots is to halving the numbers. To insert shot between 0010 and 0020 would be 0015. To insert a shot between 0010 and 0015 would be 0013 (or 0012).
I would not recommend to use 001A, 001B for shot names.